How to Replace Camshaft Position Sensor 2001 Dodge Durango
- This information provides instructions on how to change a broken or inoperative camshaft position sensor for a new replacement sensor. The facts provided herein are specific to 2001 Dodge Durango sport utility vehicles.
A camshaft position sensor CMP is an electronic device that detects or measures the rotation of the camshaft. The camshaft, of course, is a shaft that operates the position of the intake and exhaust valves on internal-combustion engines. The camshaft sensor works in conjunction with the crankshaft position sensor to synchronize fuel injectors with their individual cylinders and differentiate between spark and fuel injection events.
Camshaft Position Sensor Location
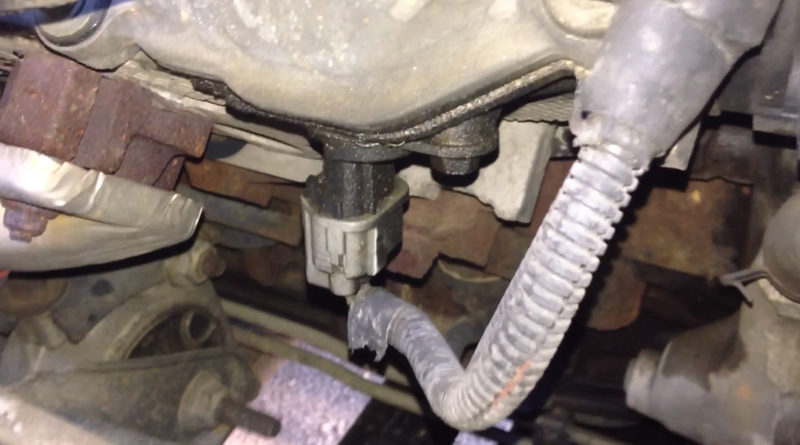
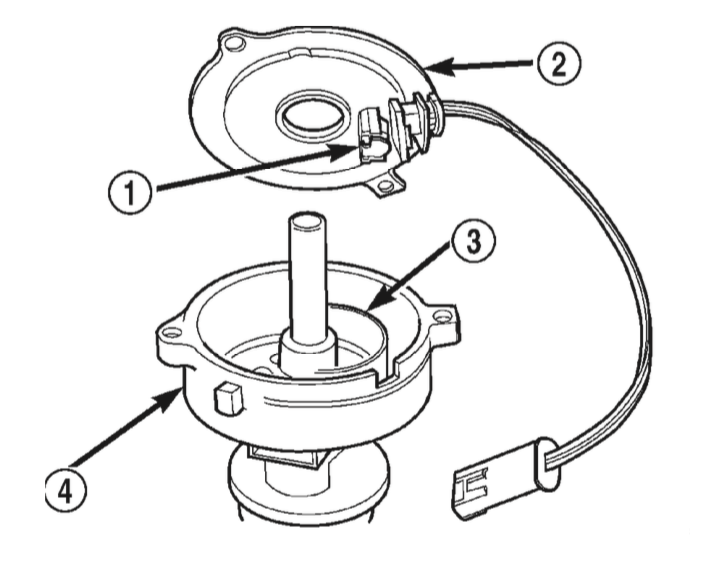
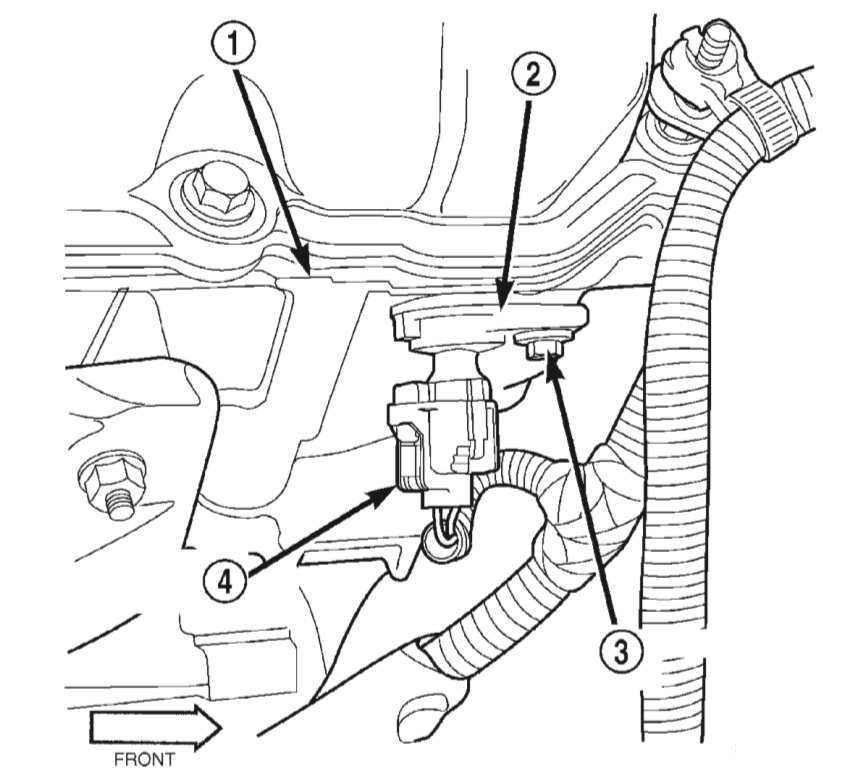
Where is the particular place of the camshaft position sensor located? The camshaft position (CMP) sensor on the 2001 Dodge Durango 3.9L V6, 5.2L, 5.9-liter V8 engine is located inside the distributor, see (Fig. 1). The camshaft position sensor on 2001 4.7-liter V-8 engine is located at the front/top side of the right cylinder head, see (Fig. 2).
How to Change Camshaft Position Sensor
Camshaft replacement procedures differ for certain engine models. Refer to the appropriate sections below based on the vehicle’s engine.
Remove — 3.9L, 5.2L, 5.9-Liter
- Take off the vehicle’s air cleaner assembly and put it to the side.
- Unfasten the negative cable from the battery’s lead terminal post.
- Unscrew both screws from the top of the distributor and remove the distributor cap.
- Disconnect CMP wire harness from the main engine wire harness.
- Take off the distributor rotor from the distributor shaft.
- Take out the whole CMP assembly from the distributor housing. Refer back to Fig. 1.
Remove — 4.7-Liter
In most cases it is less of a hassle to take out the camshaft position sensor and replace it from underneath of the vehicle. If you plan to remove the camshaft sensor without lifting the vehicle, you will need to remove the air cleaner assembly to get access.
- Raise and support the vehicle on a flat even surface. If using jack stands, be certain the stands are rated to handle the weight of the vehicle.
- Refer to Fig. 2. Disconnect camshaft position sensor electrical wire harness connector (4).
- Unbolt the CMP sensor mounting bolt (3) with 10 mm socket.
- Use two flathead screwdrivers to carefully pull the sensor, in a rocking motion, from the cylinder head.
- Check to O-ring appearance and make sure it is in good condition.
Replace — 3.9L, 5.2L, 5.9-Liter
As previously mentioned, the camshaft position sensor on 3.9L 6-cylinder and 5.2/5.9 L 8-cylinder engines is located inside the distributor, see Fig.1.
- Re-install the CMP sensor to distributor, making sure to align the sensor into the notch on distributor housing.
- Re-connect CMP wiring harness connector to the engine’s main harness connector.
- Put in the rotor.
- Put the distributor cab back in its previous position and tighten the mounting screws.
- Put the air cleaner assembly back into the vehicle.
Replace — 4.7L
- Clean the camshaft sensor mounting surface area and the hole in cylinder head.
- Add a small amount of fresh engine oil to the sensor O-ring before you put the camshaft sensor back in its previous place.
- Put the camshaft sensor back into cylinder head hole, use a slight rocking motion to encourage it in. Never use a twisting motion to get the sensor into position as this could damage the O-ring.
- Before torquing down the CMP bolt, make sure the sensor is flush on the cylinder head mounting surface.
- Put the mounting bolt back in its hole and tighten it to 12 N·m (106 in. lbs.) of torque.
- Attach the electrical connector to camshaft sensor.
- Lower vehicle back to ground.
If this article didn’t help you take out and put back the camshaft position sensor in its previous place, let us know, or if you have additional questions, post it in the comment box below.
Hello and thank you for the offer of help! I have a few questions that forums and non mechanics have only made me question more. I am working on a **2001 4.7L dodge dakota slt automatic**
My problem; about 2 weeks ago my truck began to idle rough all of the sudden. When I starts it doesn’t wanna STAY started. It stalls almost immediately, INSTANTLY when put in gear. unless I give it just gas, and keep rpms above about 800-1000. Once it’s warmed up it runs normally it seems. My scanner showed code **p1391** which I believe is a manufacturer code for a mechanical fault in alignment of timing vs cam/crank sensor validation?? I had to drive it to work the other day and the chk-eng light was off and it behaved fine!!.. weird.. heading home it stalled on startup again. Light on… used the on board/key obd reporter, and got **p1391 and p0340** (cps circut “malfunction”).
My scan tool doesn’t do live.. so starting basic, I got the CPS but am hesitant to install it. …
***my questions and the info I need from someone properly trained**….
I’ve seen tell of a “relearn sync” process?? Is that a thing? And how does it work? Ive seen info suggesting by dealership computer, mechanical timing, or specific initial start and drive procedure??
…researching a bit, it seems aftermarket parts are crap and sensor replacement works for a short time and repeats problems for A LOT of people!
.. so Im Thinking I should maybe look more into the timing chain assembly, or possible tone ring damage? Maybe PCM?
I plan to do the all electrical testing, tracing, and inspection I can.. but how could I check the mechanical innards??
Aside from taking the whole thing apart and learning the thing inside out to replace everything I find a slight issue with *I almost want to anyways haha*