2013 Harley Softail Air Cleaner Removal and Installation
- Air cleaner removal, cleaning and installation instructions herein pertain to 2013 Harley-Davidson FXSB Breakout, FXST Softail Standard, FLSTC Heritage Softail Classic (Incl. Anniversary), FLSTF Fat Boy, FLSTFB Fat Boy Lo, FLSTFB Fat Boy Special – UK only, FLSTN Softail Deluxe, FLS Slim, FXS Blackline and 2013 Harley-Davidson CVO Breakout.
An air cleaner is another term for air filter, which is a device for filtering particles, debris and other air contaminants from passing through the air inlet of an internal combustion engine. The air cleaner is an assembly that contains a number of component parts that fit together to remove impurities from the air so as to protect and prolong engine life. Particles as small as a grain of salt can result in engine damage so it is important to take off, clean and re-install the air cleaner as outlined by manufacturer recommendations.
Always replace a damaged air filter element or air cleaner assembly with a new unit if needed. The factory manual advise air cleaner inspection service intervals to be performed every 10,000 miles (16,000 km). Use this guide if you plan to remove, clean and install the air cleaner on your 2013 Harley Softail motorcycle.
Removal
- Refer to air cleaner illustration below. Softail models are equipped with an oval or round air cleaner assembly. Remove screw (1). Then take off air cleaner cover (2).

Air Cleaner Assembly Illustration - Extract three screws (4) so that you can remove the bracket (5) from the filter element (6).
- Carefully pull both rubber breather hoses (9) away from the air filter element. Take out the air filter element (6) and its gasket (7).
- Replace the air filter element with a new element if damaged or if filter is too dirty to be properly cleaned.
Cleaning and Inspection
Do not use gasoline or other flammable solvents to clean the filter element. Doing so can cause a fire and result in serious injury or death. If using compressed air to clean any part of the air filter assembly, be aware that compressed air can penetrate the skin or enter into the body through cuts in the skin. An air bubble that enters into the bloodstream could cause death if it reaches the heart or lungs.
- Carefully separate the breather hoses form the breather bolts on the backplate (8).
- Clean the air filter element. The element should be free from dirt and contaminates when cleaned.
- Wash the paper/wire mesh air filter element and the two breather hoses with moderately warm water and a mild air cleaner detergent. Do not forcibly hit the filter element on any surface so as to dislodge dirt and other contaminates from the element.
- Allow the filter to completely dry on its own or use low compressed air to free it from moisture. Never apply air cleaner filter oil on a Harley Davidson paper/wire mesh air filter element.
- Position the air filter element in front of a powerful light source. If the light is uniformly able to be seen shining through the element, it is considered adequately cleaned.
- Wash the paper/wire mesh air filter element and the two breather hoses with moderately warm water and a mild air cleaner detergent. Do not forcibly hit the filter element on any surface so as to dislodge dirt and other contaminates from the element.
- Take a close look at the seal ring (3) on the air cleaner cover for tears or cracks. It must have the ability to seal tightly against the backplate and be free from air leaks. Replace if needed.
- Check both breather hoses for holes, cuts tears or other possible damage. Replace if needed. The breather hoses must be properly mounted or it will violate legal emission standards, cause issues with the motor’s breather system and cause the umbrella valve to flutter.
- Use a clean damp cloth to wipe away any dust or particles from inside the air cleaner.
Installation
- Refer to gasket illustration below. Position a brand new gasket on backplate as seen in image.
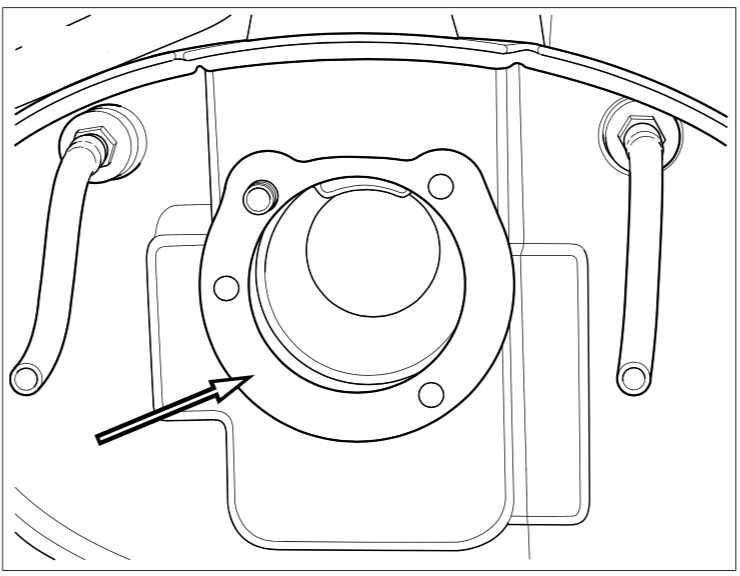
Gasket Illustration - This step pertains to oval air cleaners. Refer to illustration below for Breather Tubes on Backside of Filter. Fit both breather hoses back into the air filter element and put the element back into position. Then reattach the breather hoses to the breather screws on the backplate.
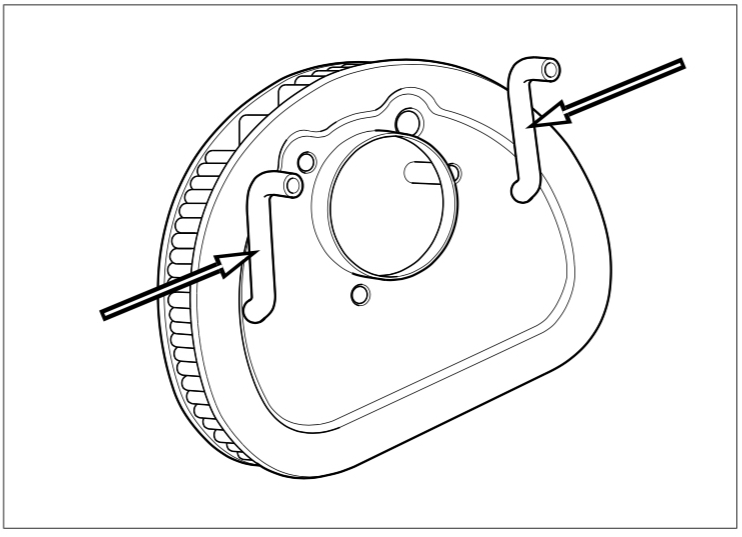
Breather Tubes on Backside of Filter Illustration - This step pertains to round air cleaners. Install the air filter element back into place on the backplate and reinsert both brother hoses into their respective holes on the front of the air filter element. Set in place the breather hoses on breather screws on backplate.
- Refer to Air Cleaner Assembly Illustration. Reinstall the air filter element and its bracket.
- Be sure to align the gasket hose with the backplate holes.
- Use three screws (4), as seen in Air Cleaner Assembly Illustration, to firmly affix the bracket and filter element. Torque screws to 40-60 in-lbs (4.5-6.8 Nm).
- Be sure to align the gasket hose with the backplate holes.
- Reinstall the air filter cover (2).
- Apply one drop of LOCTITE 243 MEDIUM STRENGTH THREAD LOCKER AND SEALANT (color blue) to threads on air cleaner cover screw (1).
- Install air cleaner cover into position and use screw to secure it. Tighten the screw to 36-60 in-lbs (4.1-6.8 Nm).
- Apply one drop of LOCTITE 243 MEDIUM STRENGTH THREAD LOCKER AND SEALANT (color blue) to threads on air cleaner cover screw (1).
A clean air filter allows your motorcycle’s engine to get unrestricted air flow which is a key component for combustion. Cleaning or changing the air filter at recommended maintenance intervals will increase fuel efficiency, reduce emissions, prolong engine life, avoid expensive repairs and improve engine performance.